
Providing artwork guides for your logo files can ensure your logo design stays intact through the decorating process. As glassware decorating experts, here at Dejabrew we understand branding and that your logo is more than a graphic on a glass. It’s at the center of how your craft and establishment are represented and shown to the world and your customers. Your mark is a symbol for all the hard work and that’s why we work hard at making sure your branded glassware is of the highest quality!
As mentioned in our previous blogpost, 6 remarkable glassware technique’s guaranteed to make your logo stand out – we talked about some basic guides to keep in mind when sending your logo artwork to us and some customer examples of each technique we offer. Now, we want to go even further and help you prep your artwork to make things seamless and to ensure your logo will look as great as the day it was designed.
- Vector ready files. Make sure your logo file is a vector image, not raster art. Pngs or jpgs will not work. Logo files come in many forms, from PDFs to native files – even jpg. Please save all files as PDF’s when sending to us. Vector images will be able to allow us to rescale and manipulate the image without losing any quality of your logo design. See the example below. One logo is in vector form and the other is in raster form or png or jgps. The raster is very blurry while the vector logo remains intact no matter the size the logo expands to.
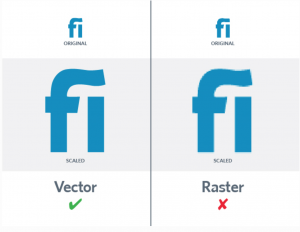
Source kettlefirecreative.com
- Convert all text to outlines or provide us with your font files. This means that all the text used on your logo and design should be converted to shapes or outlines. We have a ton of font styles here, however, to ensure that your font doesn’t get changed in the process to a different font we’ll need them in outlines. Here’s a great step by step guide on how to do that or have your designer do this for you.
How To Convert Text to Outlines in Illustrator
Step 1: Switch to the Selection tool — the black arrow — and click on the text you want to convert.
Step 2: From the menu, choose Type > Create Outlines. You can also press Ctrl/Command (Windows/Mac) + Shift + O for this.
Your text is now a group of vector objects. If you want to edit, resize or move one of the new “letters” individually, click on Object > Ungroup to separate the group.
How To Convert Text in Photoshop
The process for converting text is almost identical in Photoshop, save a few word differences.
Step 1: Select the text or text layer.
Step 2: Go to Type > Convert to Shape.
If you want to keep an editable backup of your text just in case, duplicate the text layer before converting the text to outlines. Do this by choosing Layer > Duplicate Layer from the menu. Hide the layer by clicking on its “eye” icon.
- Keep the logo design and colors simple. A great logo is known by color association and simplicity. Using 1-3 colors creates memorable images in your customer’s mind long after they stumble home. Think about the greats, Nike – one color, Coca-Cola – one color, Budweiser – two, if you count the gold.
Here is a great example from a customer – simple logo design and printing on the glass but highly creative and fun.

- Only use spot colors – this means no gradients or fading techniques. Keep your logos simple using limited colors for printing.
What is a gradient? A gradient is the gradual blending from one color to another. It enables the designer to almost create a new color. While this might look great on your website it will not transfer to your glass well.
A few other helpful hints –
Make artwork 100% to scale. Ideally – create your artwork 100% scale.
Unless it exceeds the artboard size you can output it at – in this case, scale the artwork to 50% or 25% if needed, etc. This will also ensure that your end product will be as you imagined it. We’ll also send you proofs for your approval before we print.
It will also be helpful to have export your designs in PMS so that it prints truest to color. If the design contains white it will not be viewable on the screen, therefore, please indicate this clearly by including a background color, or replace this with another color and highlight this to us.
We hope these guides provide you with a seamless process of printing and decorating your glassware.


